Observation Log and Filters
Observation log
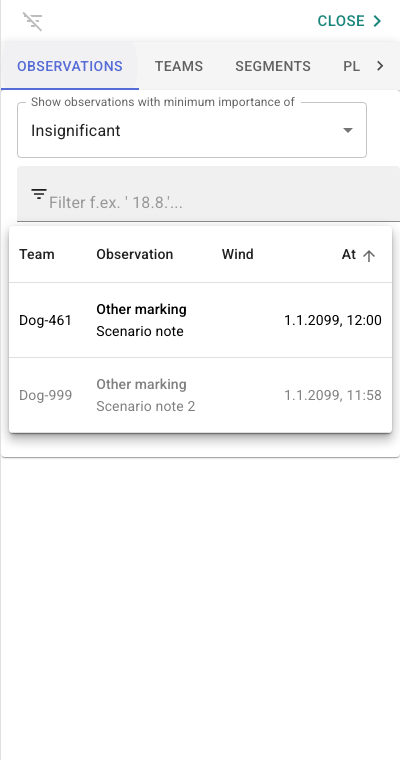
Observation log opens from the notebook button on the right side of the map. It lists all operation entries and is especially useful at command post.
Log has four tabs:
| Tab | Content |
|---|---|
| Observations | Point entries |
| Teams | Search teams sharing location |
| Segments | Operation areas |
| Plans | Routes and other plans |
Clicking any entry moves map automatically to that location.
Filtering
Filters affect map
Filters do not only limit list. They also hide matching items from map. If something seems missing on map, first check whether a filter is active: the diary open button turns gray when any filter is active in any tab. A list of tabs with active filters is also shown at the top of the diary panel.
| No filter | Filter active |
|---|---|
 |
 |
When any of the lists (Observations, Teams, Segments, Plans) has an active filter, a funnel icon and a list of the filtered tabs appear at the top of the diary panel, along with a button to clear all filters at once:

Karttahimmeli has two different filtering methods, and you usually get the best result by combining both:
- Row-level hide/focus — the quickest way to hide a single entry or focus on one search team
- Text filter — the most powerful way to find or narrow down an entire group, for example all search teams of one type, or all entries at a given time
Row-level hide and focus
The pop-up eye icon and the list eye icon are the same thing
The eye icon in an entry's pop-up and the eye icon on its row in the list do exactly the same thing — clicking either one hides that same entry from both the map and the list.
On phone, a row can be hidden or restored with a swipe:
- Swipe right — hides that row
- Swipe left — if nothing is hidden yet, this focuses: that row stays visible alone and every other row in the same list is hidden from the map. If something is already hidden, swipe left instead restores just that one row.
In a browser, focusing (the "swipe left" action) is done with the right mouse button. Hiding a single row needs no gesture at all — clicking the row's eye icon gives the same result directly, with a mouse too.
Swiping the header row — reset or hide everything at once
The header row (the column titles at the top of the list) behaves like a normal row, but affects every row beneath it at once. This is an important concept of its own, worth learning separately:
- Swipe left on the header row, or click the header row's eye icon — restores every hidden row (reset)
- Swipe right on the header row — hides every row
This is the fastest way to reset row-level filtering if you no longer remember what you've hidden.
Text filter
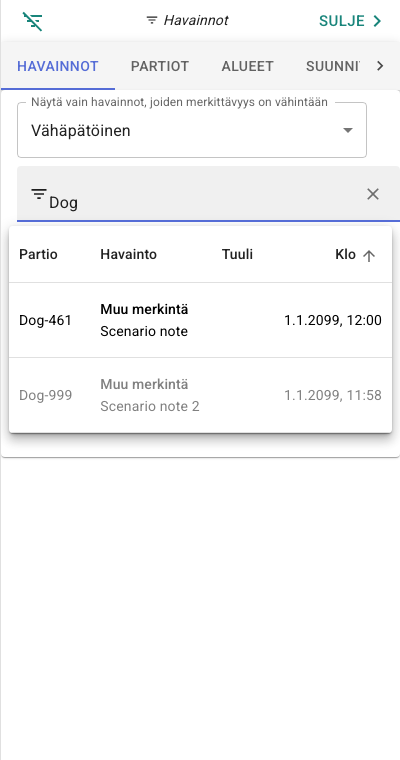
A word typed in the search field is matched against all visible fields: team name, extra info, observation type, time, and date.
The text filter is the most powerful way to find or narrow down an entire group at once, for example:
car-finds all vehicle teams, if teams are named systematicallyItemfinds all item observations18:finds all entries made around 6 PM — the search also matches the timestamp, not just text
Hide an entire category by typing any gibberish
Since the filter hides every row that gets filtered out of the list,
you can hide an entire tab's content from the map by typing something
into the search field that matches nothing at all (e.g. xxx). Then no
row stays visible.
Search is narrowing (AND type). Multiple words mean all terms must be found.
For example dog item lists only entries containing both words.
Text-based filtering on the map works so that the filter only hides the points that have been filtered out of the list. If you hide the list for a while and a new point appears on the map, it will be shown on the map until you open the list and check the filter. The filter condition is only checked when the list is visible.
Importance filter
Importance filter can hide trivial entries and show only relevant ones.
Useful at command post: set filter to Normal or Very significant. Then low-importance entries are removed from map and clutter decreases. This allows search teams to mark location points with a low threshold using lower importance levels.
Sorting
List can be sorted by clicking the columns in the header row, for example by:
- Time (newest first or oldest first)
- Search team name alphabetically
- Area size (areas)
Search team filters
Own team filter
If the map has too many other search teams' markings and they disturb your work, set your own team ID as the filter. Then only your own entries are shown.
Reset the filter when you need the wider situational view again.
In Search Teams tab you can filter visible search teams by typing start of id. This is especially useful when you want to see only dog search teams.
Filtering is OR type: you can select multiple teams visible at once,
for example Dog-03 Foot-05.
Area search is OR type
In area and search team search, multiple terms are combined (OR type):
dog01 car02 shows both. Observation search is narrowing (AND).
white sock returns observations containing both words.
Team naming aids filtering
For effective filtering, team names should be systematic. For example,
Foot-03/tk — a prefix, number, and member initials after a slash — lets you
find all members of the same team easily, individually or together.
Clicking a team name centers the map on that team's last location. Clicking the square-circle icon in front of the team name makes the map follow that team's location.
Tip for dog teams
Dog teams often work in a relatively small area, so nearby search team markings may not disturb work even without filters. Filters still help when area borders busy road or otherwise shared high-traffic location.
Area filter
With the area filter you can clean up area drawings on the map. For example,
typing active shows only active search areas/blocks. On a large screen there
is also a pencil icon next to the area name to directly edit area information.
Tail length – visible time window
Shared location draws a route tail on the map. Everything is stored in the service, but by default only 30 minutes of history is shown. The tail length can be changed from the tail selector on the top left. Options: 0 – 10 – 30 – 60 min, and 4 h, 12 h, and 7 days.
In a password-protected operation the tail can be up to 90 days.
The tail length setting also affects:
- Which search teams appear in Search Teams list (only search teams with location updates inside selected time window)
- Length of downloadable GPX route
- Speed and distance calculations in location pop-ups
Long tail for long routes
If you are checking distance in a pop-up or returning to areas you visited earlier, set the tail to e.g. 12 h.