Areas and Plans
Drawing tools
Karttahimmeli has three drawing tools:
| Tool | Use |
|---|---|
| Area | Closed area, e.g. a search sector |
| Plan (route) | Free-form line or route |
| Route area | Route with configured width on both sides |
Drawing tools are opened from the plus button.
Drawing an area
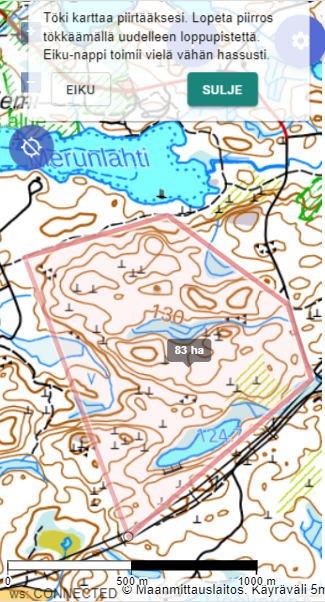
An area is drawn by tapping desired corner points on the map. Drawing ends by tapping the last point again.
While drawing, area size is shown in real time. This helps estimate how large the planned areas are.
Do not draw by contour lines
Boundaries should follow visible terrain features: ditches, valleys, hills, roads, paths, or swamp edges. Contour lines are not visible in the field, so they are not good patrol boundaries.
Precise drawing with the crosshair
Finger tapping is not always accurate enough. For precision, use the crosshair:
- Move the crosshair to the desired location
- Press the plus button
- Move the crosshair to the next point
- Press the plus button again
This also allows precise line drawing along a path.
Route area
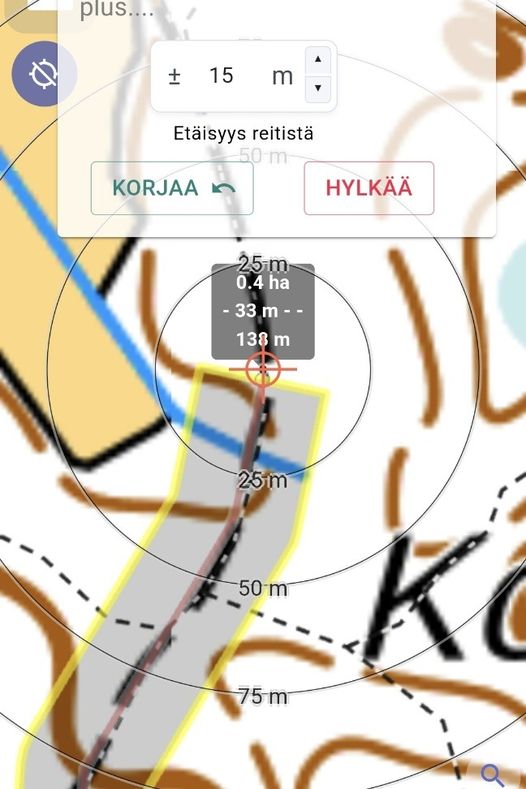
Route area width
A good route area width is the searcher's estimated effective search depth to one side of the route. Note that Karttahimmeli does not account for actual road or path width, so add that in the width setting.
Typical values:
- Dog patrol: 50-100 m
- Foot patrol ditch check: 20-30 m
- Foot patrol visual scan: 30-50 m
A route area is drawn like a route, but with a width from the centerline. This is useful for:
- Planning road-side checks for vehicle patrols
- Planning dog search patterns
- Creating route-based sweep areas
Drawing on phone
Drawing with fingers can be difficult with gloves. Use the crosshair for precise points, or draw roughly first and refine later.
Extra info for areas
Areas can include:
- Name - shown on map as text
- Extra info - free text field
Extra info can include at least:
- Instructions to patrol (Start from north)
- Terrain notes (Stream crossing difficult, use rocky section)
- After-action note (Area covered, no findings, snow to mid-calf)
Remind the patrol
If you wrote important guidance in area extra info, tell the patrol separately that extra info exists.
Colors in plans
Routes and plans can use four colors. Colors can be used for example by:
- Different phases
- Different patrol type
- Checked vs planned
Advanced: planning with layers
Command planning can be done on a separate password-protected layer that is not visible to patrols. Plans can then be published on the default layer at the right time. See Layers guide.
Editing and deleting areas
Completed areas and plans cannot be edited. If correction is needed, delete and redraw. Redrawing is easier because Karttahimmeli snaps to nearby existing lines.
Deleting an area requires typing patrol name for confirmation, which helps avoid accidental deletion under time pressure or when wearing gloves.
Navigate to area
Next to area or plan points there is a route button that opens Google Maps navigation to that point. Useful when patrol needs access to a rendezvous point.